Important Instructions for Handling
Every eyewear system has its own special features. We therefore ask you to please take a moment to read our handling tips, so that working with and on our glasses will be an effortless task.
Every eyewear system has its own special features. We therefore ask you to please take a moment to read our handling tips, so that working with and on our glasses will be an effortless task.
The demo lenses used in our glasses, which are included in the delivery, also serve as a perfect template. Since our polyamide fronts are very light and filigree, and therefore also flexible, it is better to trace the supplied supporting lenses as a form.
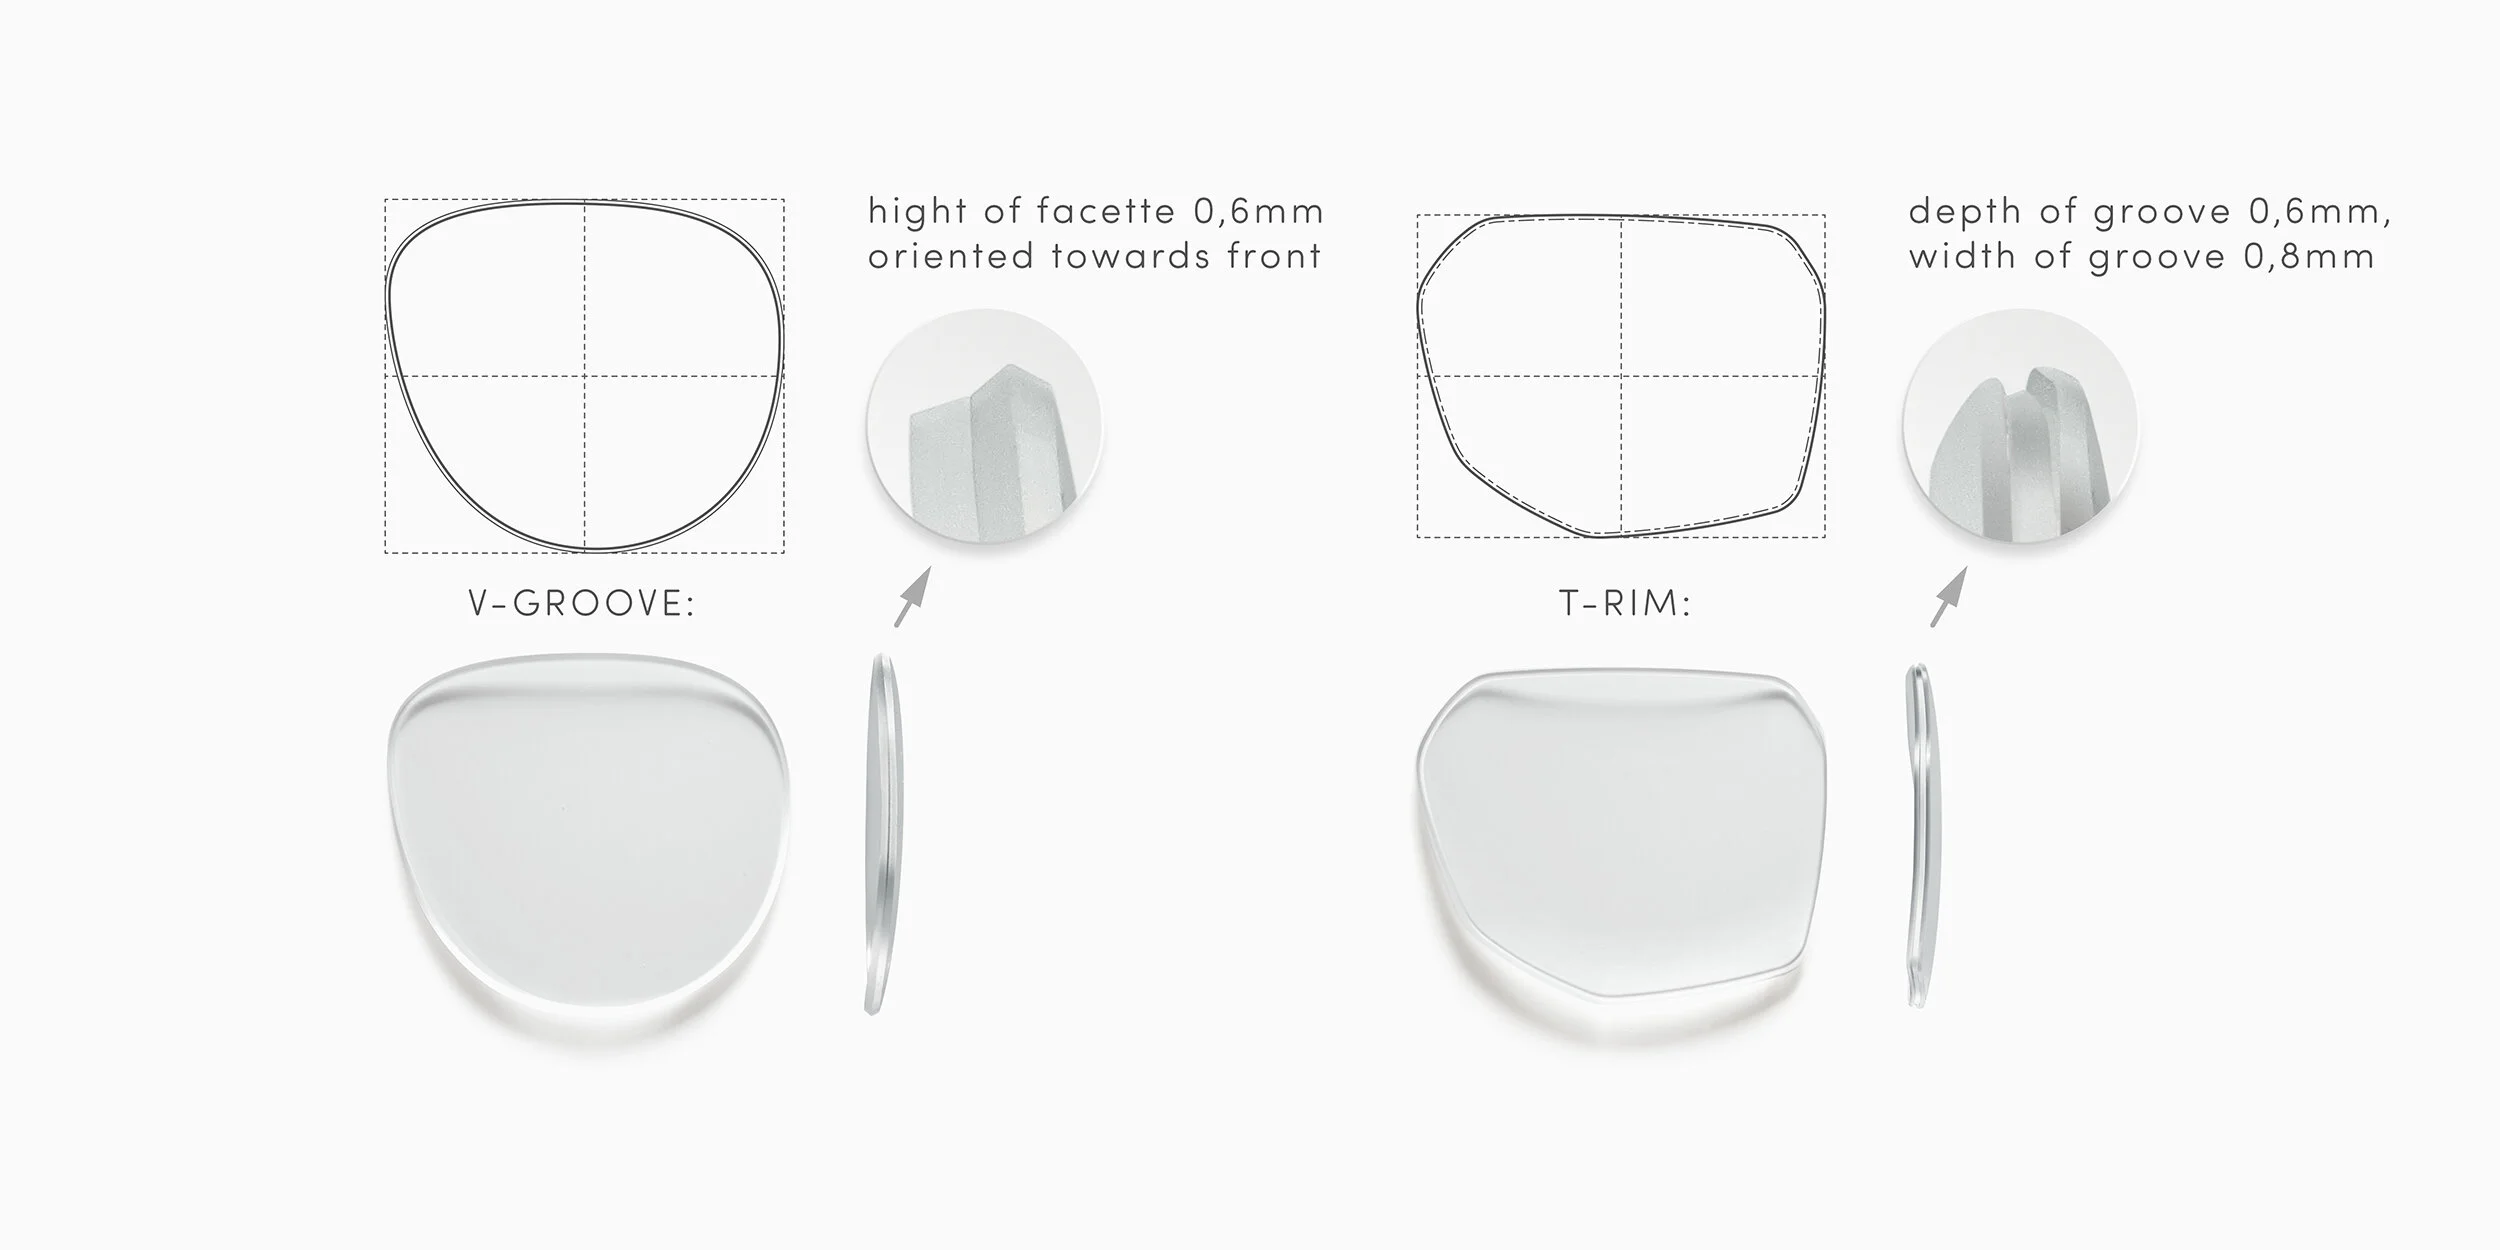
It is important to pay attention to a correct adherence of the dimensions, with both systems; the dimensions for both the standard V-Groove as well as the T-Rim/Nylor may not be exceeded significantly.
The groove depth for the V-Groove variant is standard 0.6 mm. For the T-Rim/Nylor version, a groove depth of 0.6 mm is recommended and the width of the glass groove should not be less than 0.8 mm.
The insertion of the lenses in our glasses takes place completely without tools.
Our fronts have been designed to give the best results with relatively flat curves between BASE 2 and BASE 4. Polyamide is quite flexible and the pre-set curvature of 3.5 adjusts automatically without deformation or the need for heating.
The insertion of the lenses takes place frontally, a stronger heating of the front, as is sometimes done with acetate, is not necessary, but a temperature slightly above hand-temperature facilitates the insertion. As with most commercially available plastics, never work on a frame which is extremely cold.
Heating the frame for extended periods of time or even heating it in order to be able to glaze 'better' is of no use, since polyamide can be bent easily; either way it should not be stretched aggressively.
We always recommend starting with the upper outer corner [ 1 ] of the eyeglass shape, it is then very easy to insert the lens laterally downwards [ 2 ].
Then continue by pressing the in glass along the upper edge [ 3 ] in the direction of the nose bridge.
There is a good reason for our recommendation: for anatomical reasons, the area along the nasal contour of a wide variety of models follows a rounded, elongated curve, regardless of the shape of the outer contour. For this reason, the forces are evenly distributed at this point and the glass slides into the V-Groove or onto the T-Rim without excessive pressure or torsion.
At this point we would like to comment on the subject of inclination and changing the pantoscopic angle, because we believe that this topic should be clear for anyone working with our frames.
We can answer the question 'Are your glasses inclinable' with yes, but we think that this will rather mean modification, i.e. the subsequent change of the pantoscopic angle.
Generally, glasses have an angle of inclination given by the manufacturer, and so do we: we determine the angle by positioning the temple at the front, so that it may vary from model to model (the average angle corresponds to about 9° from the vertical). This way we achieve a good basic positioning of the glasses on the face.
Sometimes it is necessary to make changes to the pantoscopic angle for anatomical reasons.
Our fronts are easy to heat, but the material does not become completely soft, as is the case with acetate, for example; it simply becomes more pliable during the forming process.
What is the easiest way to do this? First, heat the area with the joint block: slowly and with a little patience, because you should give the material the opportunity to distribute the heat evenly. Just wait a short time, do not let it cool down, then heat again briefly (3-4 times).
Now hold the front securely with one hand (with the demo lenses in), and with the other hand (keep thumb and index finger flat) bend the hinge block in the desired direction with pulsating (but not jerky) movements. You can also use a pair of plastic-coated pliers, as long as you maintain sufficient feeling and control when bending.
This works well in both directions. Even if it is not absolutely necessary, you can also cool the glasses with water after fitting, as is done when fitting horn, the material can withstand this well in any case.
In theory, you can also deform the titanium temple in the front area (i.e. only the metal), but we do not recommend it. Directly in the back of the ear, however, an additional bend can be hidden very well.
For the holders of our nose pads, we deliberately decided against a variant with metal arms. This may work aesthetically and technically for a rather strong and thick-framed collection, but our glasses are minimalist slim and filigree and offer high adaptability in a slightly different way.
The opening angle of our glasses tends to follow the southern European angle (Some colleagues call this the Mikli nose Fig.1). Sometimes it may be that the narrower Rodenstock shape fits a little better, in which case it is advisable to heat the eyelets for the pads and deform them inwards in the desired direction (Fig. 2).
IMPORTANT: Always bend the entire pad holder, i.e. also at the transition into the frame (dashed line in the illustration below). On the nose side (i.e. outside), the holder follows the angle of the outside contour, but on the inside you can clearly see the transition into the frame. Here, always move the lower edge of the holder as well (see dashed line in Fig. 1-3).
For minor changes, you can really easily achieve the preset opening angle of the polyamide holders by hand (here best with the silicone pads in). For more extreme corrections, please adjust with plastic coated pliers (here best without the pads, heating the part helps in any case, see inclination above).
If adjusting the angle of the nose pads has not yet led to the desired result, perhaps because the width of the nose bridge does not yet fit perfectly, then you can also optimize the fit of the glasses with our various nose pads: the different thicknesses (1.15 mm, 2.0 mm and 2.5 mm) of the pads also allow asymmetrical solutions.
We have been able to win over Frey & Winkler as a partner and therefore you can additionally choose the ideal dimension for your customer from the complete range of their System 3 series.
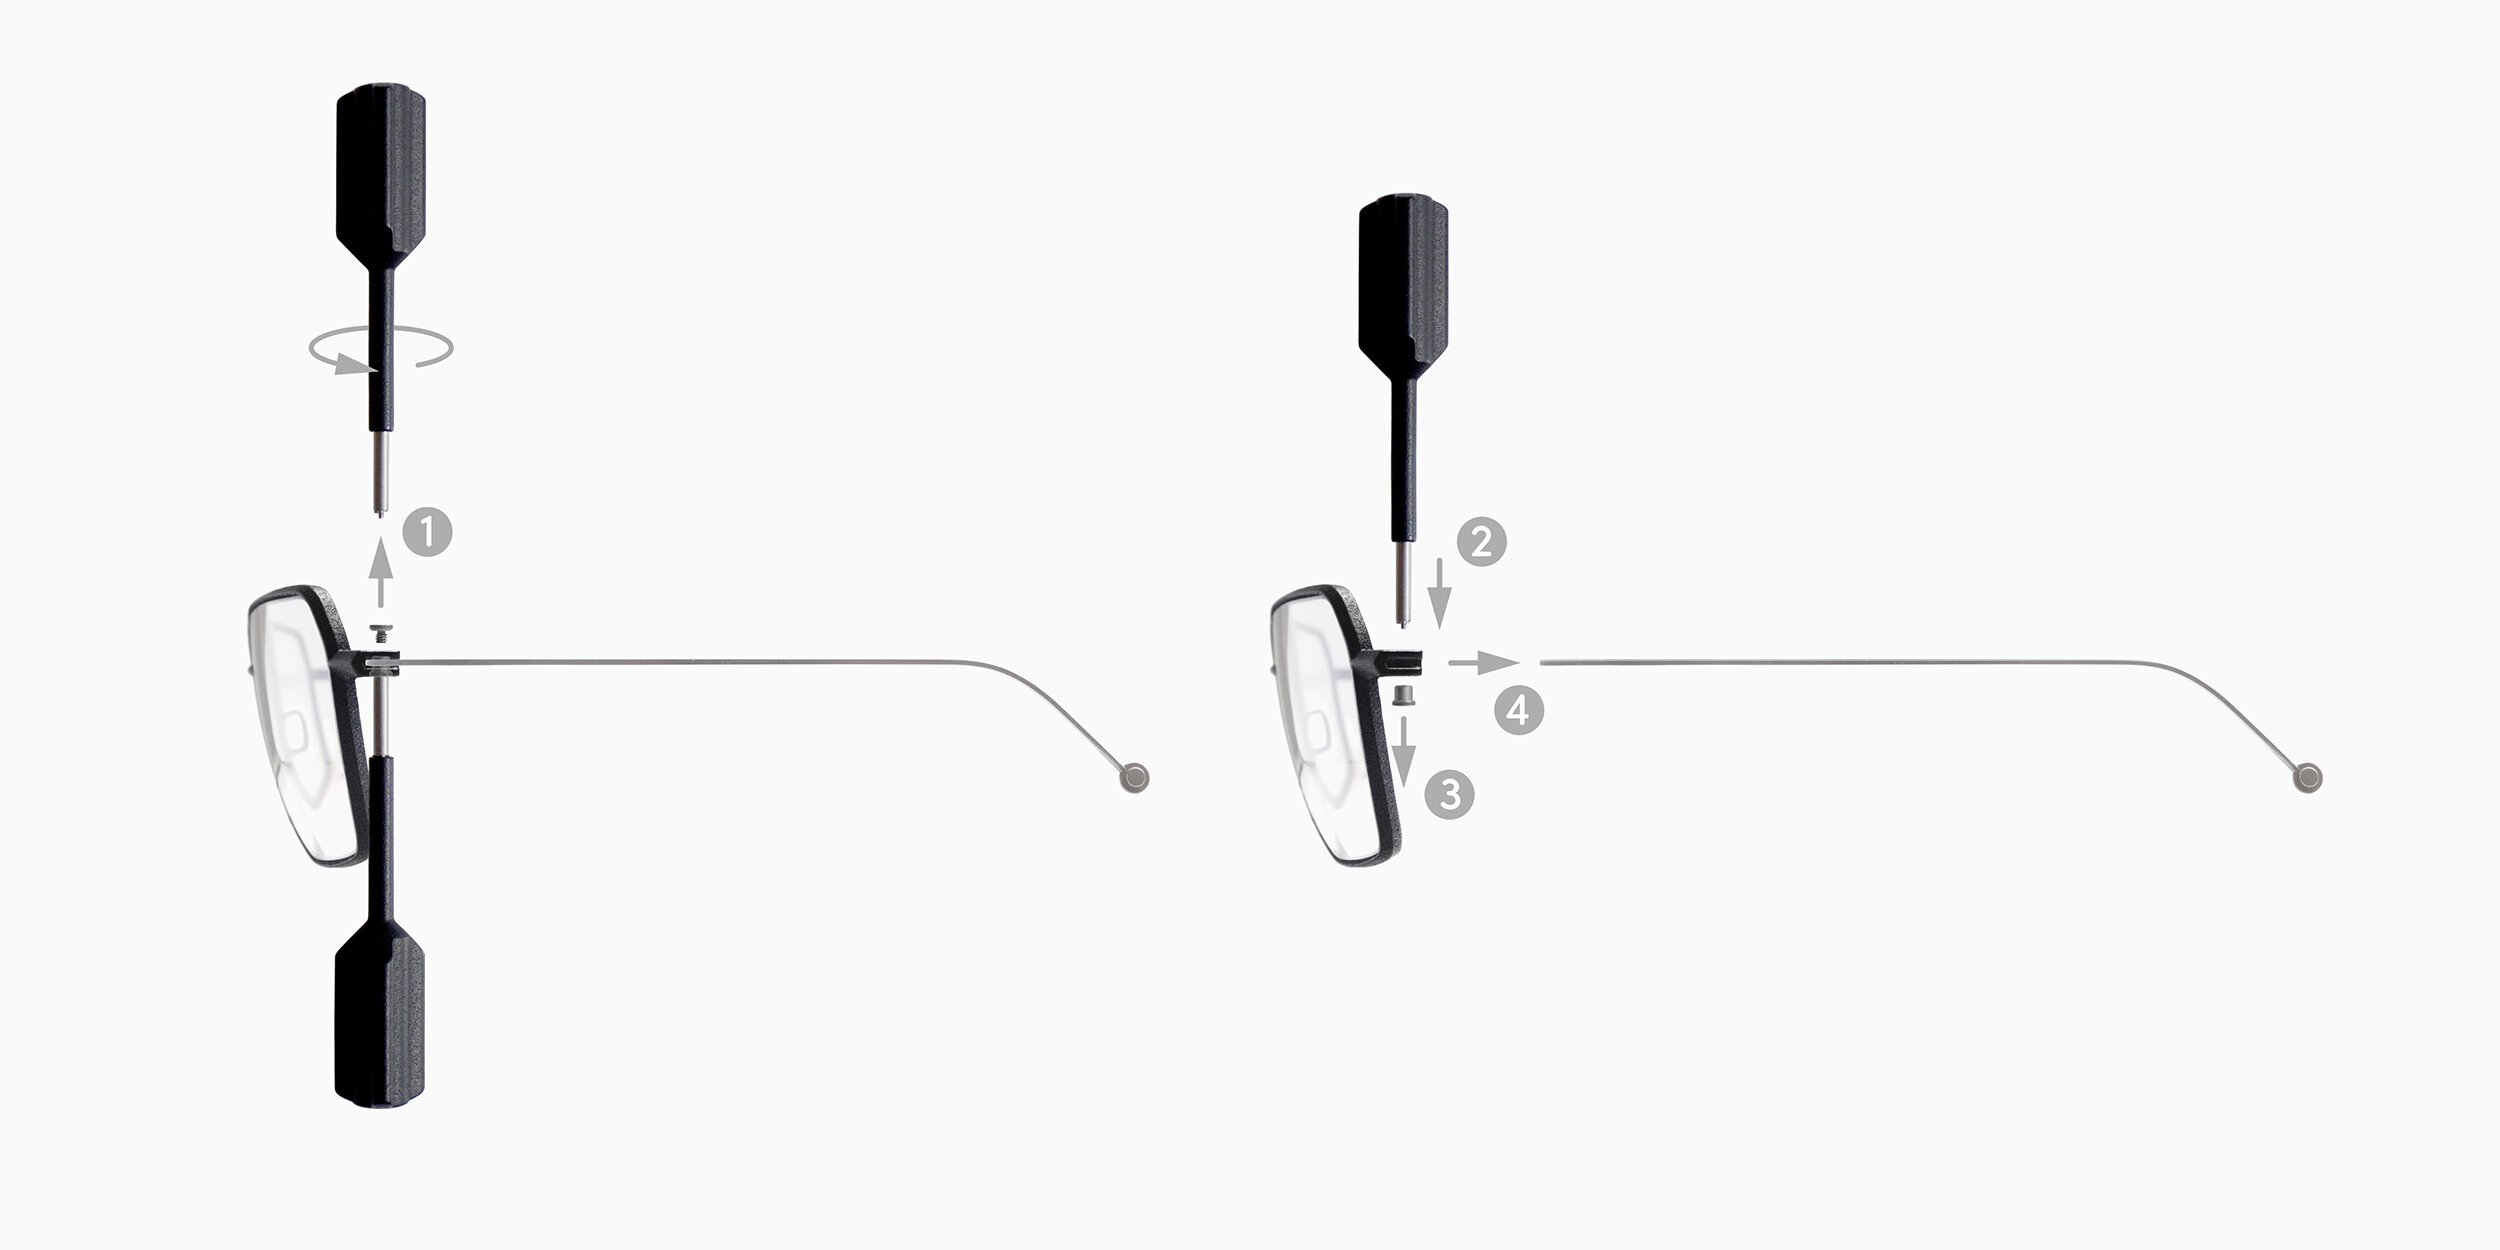
Both of the identical tools are required to disassemble the hinge. Since the assembled screws provide a rotational center for the temple, using only one tool rotates both screws. Therefore, one tool should be placed in the lower screw and held firmly, while rotating the top screw counter-clockwise with the second tool.
Once the top screw has been removed, the tip of the tool can be used to push the remaining nut downwards and out of the hinge block. A note of caution: the screw and nut are small, these steps are best done just slightly above a work surface to prevent the parts from bouncing around and getting lost.
The small pin at the head of the tools fits perfectly into the central bore of the heads, preventing the drive from slipping. Always make sure that the heads are perfectly positioned so that the coated surface of the heads is not damaged!
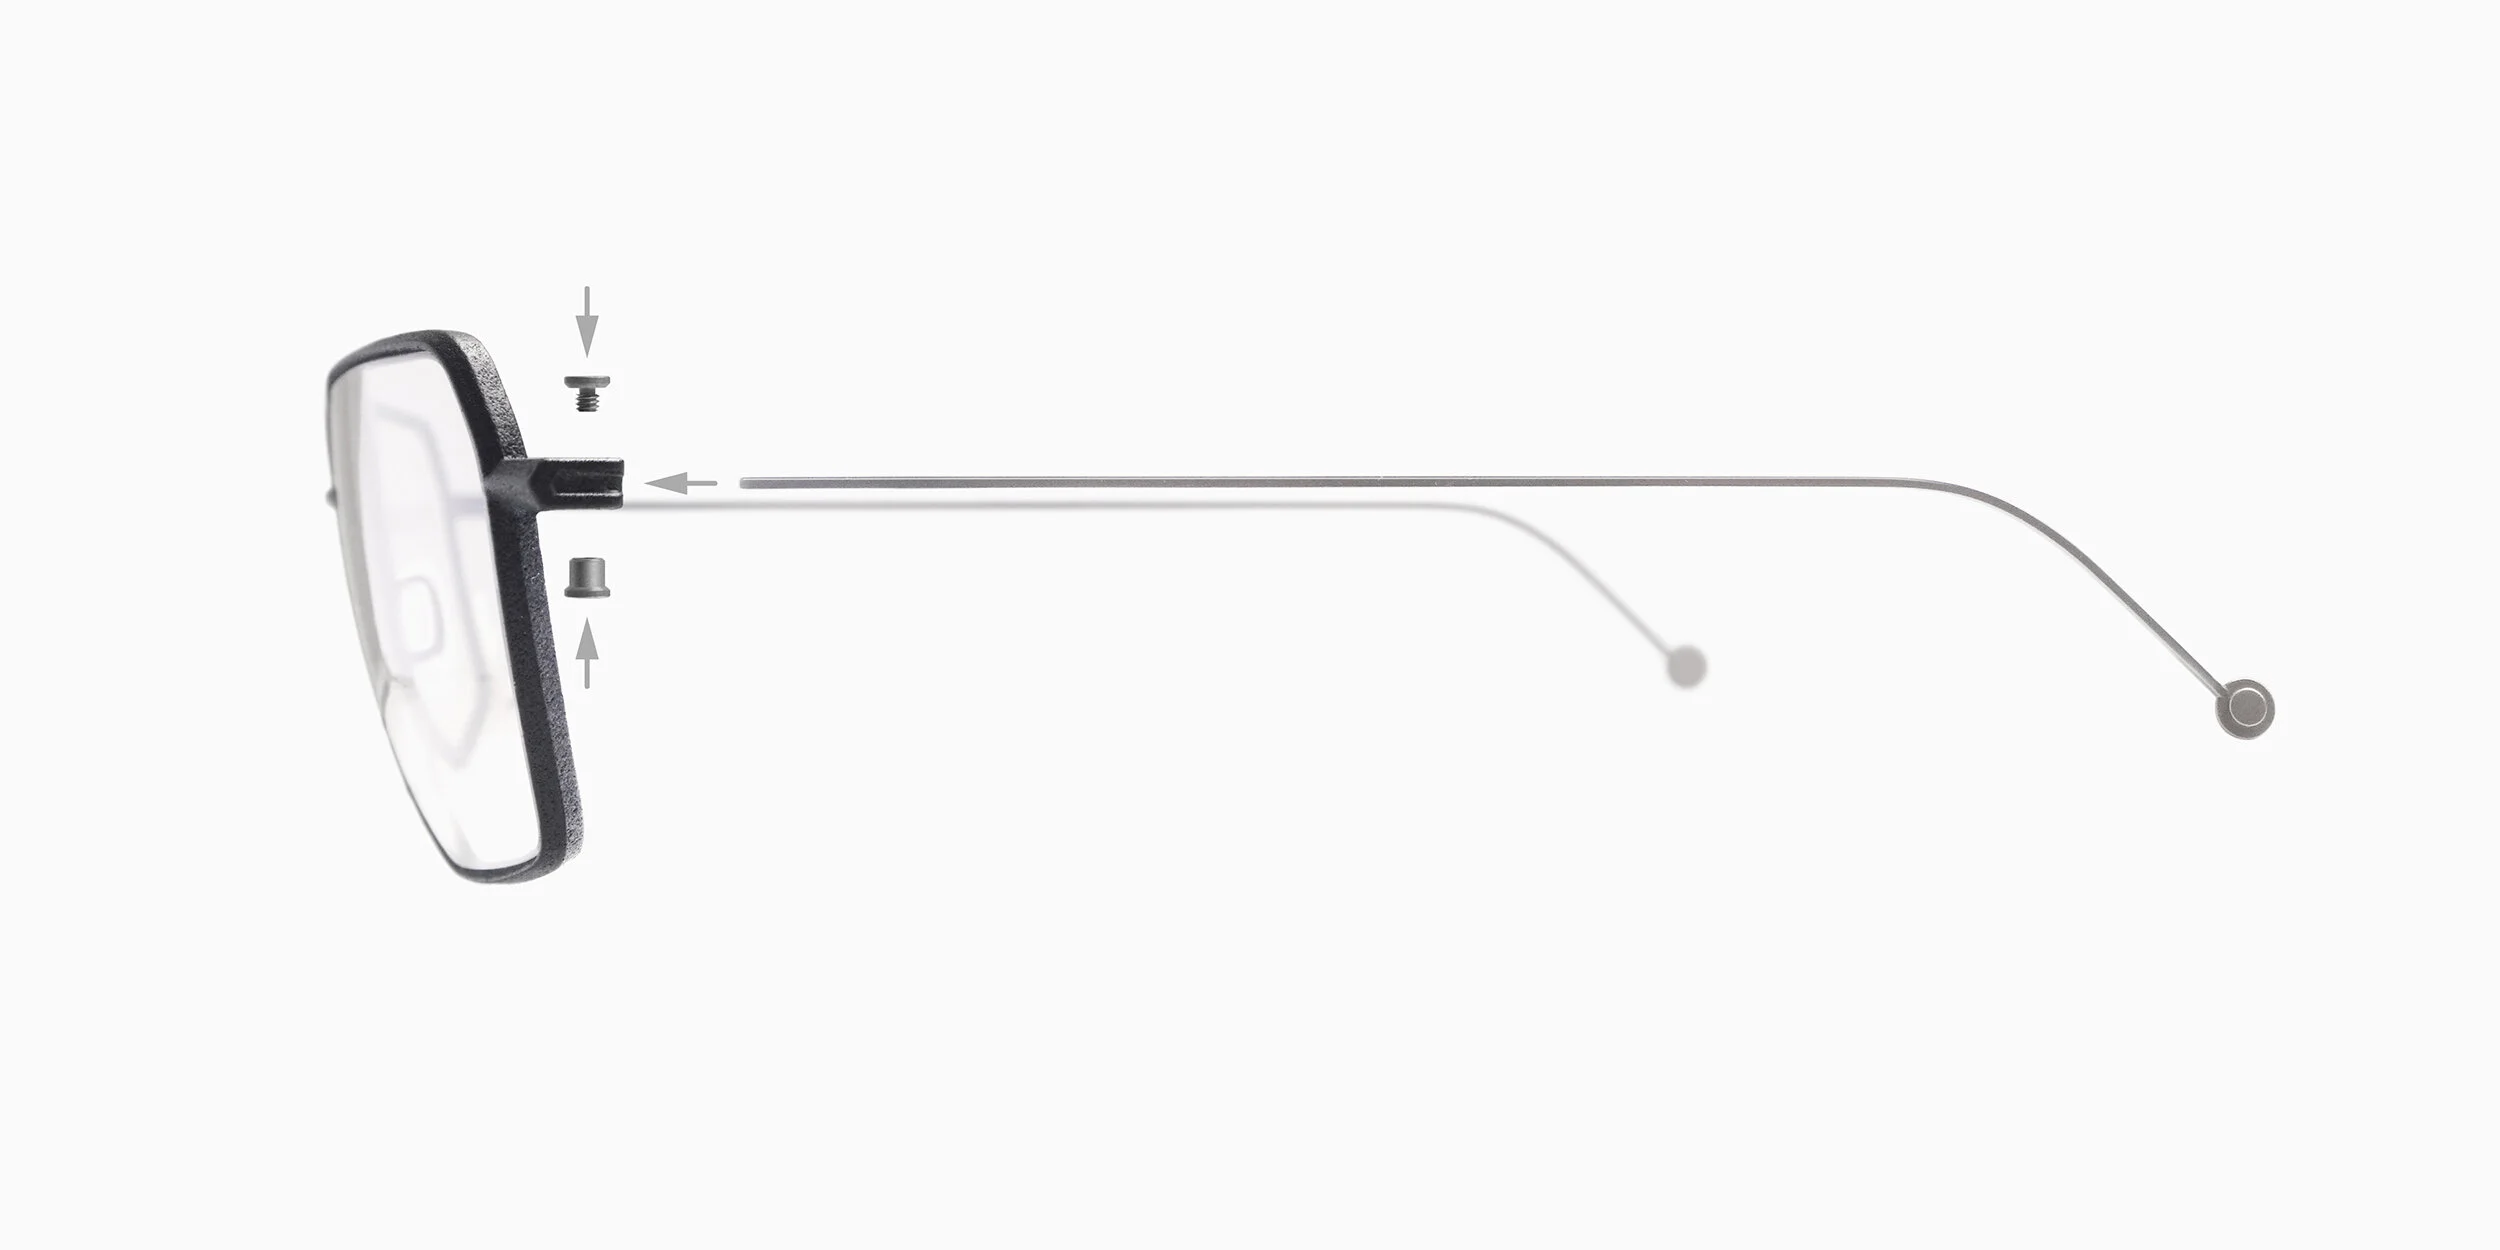
Once the screw (upper) has been removed, the nut (lower) can be pushed downwards out of the opening. Only then will the temple released. Please pay attention to the position: the temple should only be inserted or removed in the 'closed' position.
After disassembly and re-assembly of the bracket, where the screws and nuts have been removed, we recommend carefully applying a small drop of screw lacquer to the thread of the nut just before re-screwing, to secure it in place. Do not tighten the screw too much, the free movement of the temple must not be compromised.
At the very beginning, even before the actual founding of our company, we thought about numerous novel mechanisms and in the end we decided for a simple, easy to understand hinge system with its own fastening mechanism: a nut specially developed and manufactured for us, which both serves as the rotational axis for the temple as well as the counter-part to our custom trilobal flat-headed screw.
We believe that screw systems have clear advantages; they are easy to work with, reversible at all times and durable. And the special drive profile, developed in-house, enables us to realize a hinge-block dimension of less than 4mm overall height in polyamide.
Through our minimalist and consequent design language, this special screw comes into focus and becomes an integral part of the construction as well as the appearance of our frames: hence the trilobal, i.e. three-leaf drive in the head! At first glance, it doesn't appear to be a screw at all and this is what gives our glasses their unmistakable look.
When you open and close the temples, you'll notice some resistance: once you rotate the temples over the half-way point, the temples will glide in their respective end positions and remain secured.
An unwanted forceful springing movement or rattling of the temples is a thing of the past.
The gait regulation and locking of the temples is not achieved through the tightening of the screw and nut, but rather by the special geometry at the front end of the temples.
Our glasses are modular, all components are compatible with each other and easily exchangeable. The tool set consists of two identical screwdrivers with which the temples can be exchanged quickly and easily.
Other temple lengths and colours can thus be assembled without any problems.
Each of our frames, i.e. the assembled polyamide front and titanium, is delivered with a pre-selected set of temples, in the color and length we feel best matches the respective front.
Sometimes it is necessary to change the temples for anatomical reasons or at the customer's request. Therefore we offer two lengths of temples, in all colors and finishes, in lengths 130mm and 140mm.
Not only the length, but also the color of the temples can be easily changed in this way. Each color and finish is available in 130mm and 140mm for re-ordering.
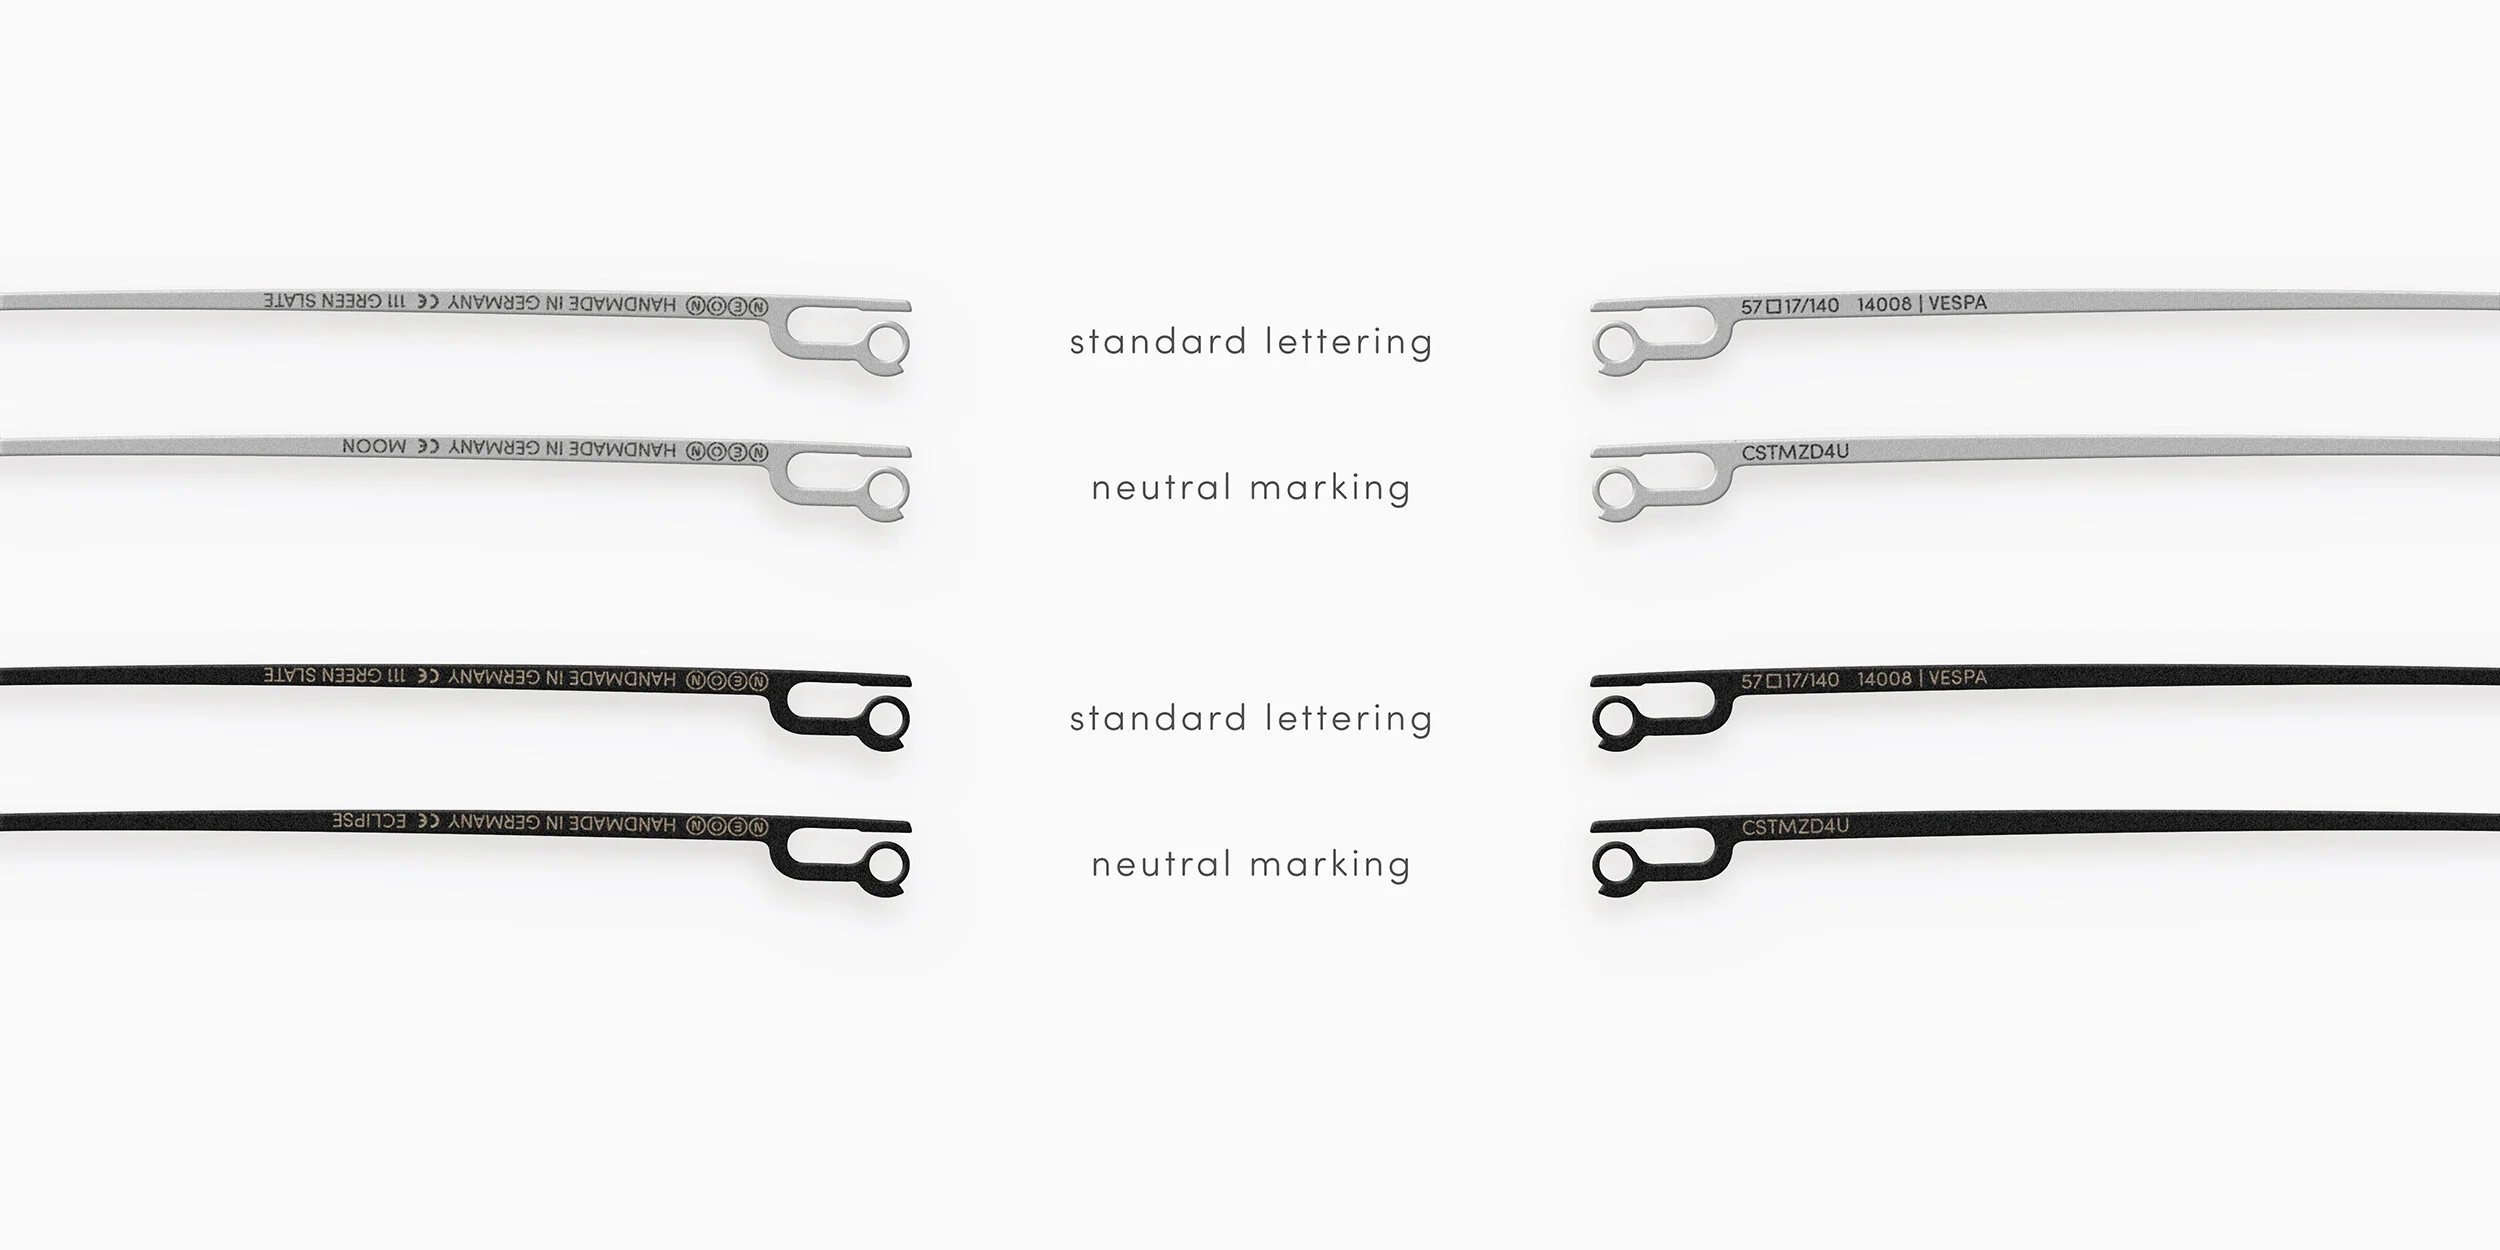
The only difference to the pre-assembled parts is the neutral laser-marking on the underside of the replacement temple pair. Instead of the name of the respective model you can read the abbreviation CSTMZD4U here: Customized For You. On the right temple, following the CE-symbol, the titanium color replaces the polyamide color.
IMPORTANT: The tool is trilobal, i.e. the drive on the tool has three wings! Therefore, you cannot and should not use screwdrivers with other drives such as Flathead, Phillips Head or Allen Key drives, as this will damage the screw and the nut!
Various original images are available in multiple print-ready formats for direct download and usage in store-fronts at the following link: